How to integrate SmartyStreet in OneShield
All of who work in or for insurance domain is quite familiar with the benefits of address verification for the sector. Benefits like –improvement in risk assessment, preventing premium leakage, streamlining operations and most importantly improvement in data quality, makes the selection of good Address Verifying software truly important.
In this article, I would like to discuss the integration of one such software- SmartyStreet with OneShield, which I believe is the best address validating software I have come across so far and hence recommended to my client. SmartyStreet brings many advantages to their clients, few of them are:
- Improved Quality of Address Data due to USPS and international address verification feature.
- Option of both online lookups and web services calls.
- Elimination of time and effort spent on updating data
- Unlimited calls in REALLY affordable price.
- No maintenance required.
- Accessible by Multiple Users
- Secure Processing
- You can validate multiple address on one page like Risk, Mailing, and Billing etc.
Apart from the reason mentioned above, its benefits like reduced downtime and ultimate response time (yes, I am talking fraction of seconds here!) which helps us not only in our production environment but delivering the best to our clients as well.
So, sensing that you’re already sold on the goodness of the application, let’s quickly understand how we can integrate it with OneShield.
Step 1: Go to the SmartyStreet website, click on Resources- Documentation and choose Cloud API reference and Website plugin.
How Website plugin works: It sends the request to SmartyStreet as soon as user start typing the address on address field , a predefined popup appear suggesting closet matching addresses on the UI.
Website plugin provide us with a standard JavaScript file, which anyone can use. It has some installation requirement though; please find the image below for your reference.
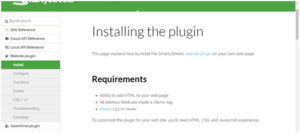
As you can see it requires JQuery 1.5.1 or newer and if you are an OneShield developer, you must be aware that OneShield also uses JQuery version 1.4.2 for core version 4.19.XX , and there is challenge to integrate SmartyStreet Plugin!
To overcome this issue, we downloaded and modified SmartyStreet JS file (refer the highlighted part of the image shared below) to make it compatible with the 1.4.2 JQuery framework of OneShield and included the file on website.
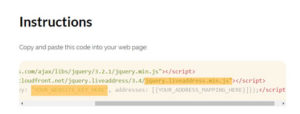
It is very important to note that you have toreplace “YOUR_WEBSITE_KEY_HERE” (refer to the image above) with a website key (provided by SmartyStreet) for the website on which you’re installing the plugin; else, they will invalidate the request!
Now as per the environment (Dev/QA/Production), we created different keys – the functionality available with SmartyStreet. These keys per environment can be maintain in system attribute and read at run time whenever your plugin loads.
Let’s now move to Cloud API reference, where we call the web services using HTTPS or HTTP and get the information back.
If You check the generated HTML page of OneShield it include necessary javascript files at start and that is the custom functionality and cannot be modified. To include SmartyStreet plugin file, we use Page_Layout_Cell configuration to include modified js file.
Then we pass the data required to identify the address fields on UI and invoke the entry point from SmartyStreet js plugin file. This plugin then identify the address component on UI. Now when user start typing in address line 1, internally plugin file grab data entered on UI and ajax request send to SmartyStreet web interface. In return first 10(this can be configured as how many returns records are expected) matching records in JSON format. These records are then shown in drop down list that is attached to address line 1 field on UI. All this is done from plugin provided by SmartyStreet.

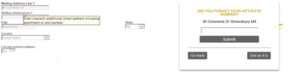
This would help us to determine:
- Whether entered address is valid /invalid.
- User also had ability to accept entered invalid address

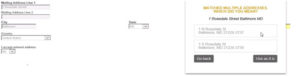
In above screen User can select Go Back and system mark address is invalid or User can select Use as it is and System make address accepted

3. SmartyStreet also identify if entered address need apartment info and that popup to enter that info
4. Smarty Street also identify entered address as ambigious and provide selection for correct address
5. Once address is verify the verify button mark below zip code is turn to green

User can change from verify to Unverify by selecting Undo from same image.

This clears the zip field and entered address mark as un verified

On Verified address once user change any of address field like Address line 1/State/City/Zip that address is marked as unverified

Now when user change City

* One thing you need to keep in mind that your machine will be directly sending request to SmartyStreet without your application server in between (till you hit the submit button), so you need to make sure to remove any filters or blocking, else your client site HTTPS calls with fail.
Apart from easing and upgrading the process for our client, we were able to use the huge chunk of money, leaving them delighted. So try it, and contact us if you need any help from us for integrating it with your application.
Hope this helps and happy reading!
PS: We are not SmartyStreet partner/vendor, and speaking solely on the basis of our experience.


Post a comment